Established in 2010

Tuesday, September 28, 2010

Dose of Dorsey

My Dears...  It's been a while... I don't have time for a long post tonight but thought I'd share a series of pics that made me giggle.

Sweet & Calm = Not Her Usual Self 

Bahaha. There's our girl! 

Dorsey Dog is great and so are we! I miss blogging but I'm just out of sync right now. Motivation is on it's way - I ordered a new DSLR camera and think it's what I need to get back in the game. 

xoxo

Monday, September 13, 2010

j'adore.

Two years ago I said "I Do." A Little History - Nick and I met almost nine years ago in Dorsey Hall, our Freshman dorm, at Miami University.  Oh the memories we've shared!

Here are a few images from our wedding day...


How lucky I am... Cheers to us Nicholas Mark!

Saturday, September 11, 2010

DIY: Dresser Revamp

Many, many moons ago, I shared with you a sneak peak at a project that I had in the works. Well, four months have passed (gosh that's embarrassing to admit!) and today I am finally ready to share the finished product.

Even though we completed a bulk of the work before we moved, we didn't have a spot for it in Mini House #1 and once we got to Mini House #2 it still needed hardware so I have been holding off on posting...

Spotted: Huge Thomasville Dresser on Craigslist

Large in Size, Small in Price - Only 40 Bucks!

Note: To kick this party off, remove the out-dated, brass hardware. 

Next up: clean & sand

Per usual, Dorsey supervising

Note: After sanding and before priming, use tack cloth to remove the access dust / debris.  

Next up: Prime & paint while wearing a mask

We are diehard fans of Rust-Oleum 2x Coverage spray paint. I've worked with other brands and none compare. Here's another tip - buy a spray paint trigger.  It is the best $3 dollars you will spend, trust me. 
In case you need visuals for when you go to Home Depot, Loews or your local hardware shop.


Note: For this project it took us 1 Coat of Primer, 2 Coats of Paint and 3 Coats of Wipe-on Poly.  Easy as 1-2-3, LITERALLY! 

Wipe-On Poly was recommended on lots of blogs to help protect one's hard work. Here's the rub though & a word to the wise: white or antique white paint + too many coats of wipe-on poly =  a slight yellowing... just sayin'  :) 
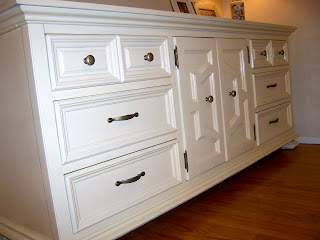
Alright if you've made it this far and haven't given up on this post - here's the after. 

What an improvement!

Isn't she pretty? 

Close-up (not a great one)

The total cost (excluding our manual labor) was under $100 which isn't bad, eh?  It was a learning experience for us and of course we are always looking for another project / adventure. 

Friday, September 3, 2010

Pelmet Box: Guest (My Sister!) Post

Growing up I was always the creative sister, but I will say my baby sister has definitely taken the reigns now as adults.  Feeling inspired by Emily's DIY spirit, I decided to create pelmet boxes using the how-to guide by Little Green Notebook.  She did a cute scalloped look - I just wanted a basic line to add a little something to my entry way & kitchen.

Here are the tools needed to make these:
  • Fabric
  • Trim
  • Heavy Foam Core Board
  • Duct Tape
  • Fabric Glue
  • Staple Gun
  • Glass of Wine (optional but encouraged)


First measure your window and determine the necessary size for your foam board.  On the guide, it didn't really tell you how to cut the foam board. I honestly used a serrated kitchen knife.  So however you want, cut to the correct size then duct tape (yes, duct tape) together.  You'll also need to cut the sides to create depth.


Here is a closeup of my side.  Penny my poodle supervised from her bed.

Next, line with batting and staple the ironed fabric.  To make it more polished, I lined the back of the pelmet box with fabric as well.


Here we go... ready for trim and hooks.


Next, fabric glue the trim.


Then add key hole hooks to the back with epoxy glue or with fabric glue. I made two of these and both glues worked really well. Last but not least hang and admire your hard work. 


There you have it!  All in all this took me about two hours for each pelmet box with Penny's supervising, of course.

Cheers from the Middle Sis!  

Thursday, September 2, 2010

Be Our Guest

I apologize for the lack of posts in the past week!  We were lucky to have wonderful out-of-town guests and  wanted to be a great hostess while they were visiting.  I LOVED every minute of each visit but am ready to get back into the blogging swing!

Wanted to share a few pics that make me smile.

 Seeesters 

Angels Game with Two of My Favorite Guys

Alright gang - thanks for hanging in there and following! Now get ready for lots of super fun posts headed your way!  You deserve em'  - xo