Established in 2010

Showing posts with label Decor. Show all posts

Saturday, September 11, 2010

DIY: Dresser Revamp

Many, many moons ago, I shared with you a sneak peak at a project that I had in the works. Well, four months have passed (gosh that's embarrassing to admit!) and today I am finally ready to share the finished product.

Even though we completed a bulk of the work before we moved, we didn't have a spot for it in Mini House #1 and once we got to Mini House #2 it still needed hardware so I have been holding off on posting...

Spotted: Huge Thomasville Dresser on Craigslist

Large in Size, Small in Price - Only 40 Bucks!

Note: To kick this party off, remove the out-dated, brass hardware. 

Next up: clean & sand

Per usual, Dorsey supervising

Note: After sanding and before priming, use tack cloth to remove the access dust / debris.  

Next up: Prime & paint while wearing a mask

We are diehard fans of Rust-Oleum 2x Coverage spray paint. I've worked with other brands and none compare. Here's another tip - buy a spray paint trigger.  It is the best $3 dollars you will spend, trust me. 
In case you need visuals for when you go to Home Depot, Loews or your local hardware shop.


Note: For this project it took us 1 Coat of Primer, 2 Coats of Paint and 3 Coats of Wipe-on Poly.  Easy as 1-2-3, LITERALLY! 

Wipe-On Poly was recommended on lots of blogs to help protect one's hard work. Here's the rub though & a word to the wise: white or antique white paint + too many coats of wipe-on poly =  a slight yellowing... just sayin'  :) 
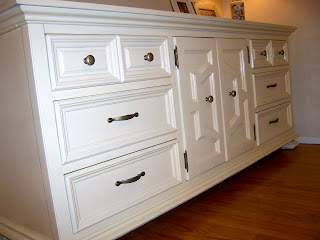
Alright if you've made it this far and haven't given up on this post - here's the after. 

What an improvement!

Isn't she pretty? 

Close-up (not a great one)

The total cost (excluding our manual labor) was under $100 which isn't bad, eh?  It was a learning experience for us and of course we are always looking for another project / adventure. 

Thursday, August 12, 2010

DIY: Pelmet Box

On Saturday we marked off two projects from my our to-do list!  Always a good feeling.

The first project was repairing our gate that I backed into with my MINI.  Oopsie Daisy! Thankfully the gate materials cost around $5 + Nick's free labor.  Now the dent on my car... it will require a little more moolah and a professional...

Thanks Handy Hubby!

Next up was building a pelmet box for our bedroom. I purchased the fabric for this project with the ambition to build it for our bedroom at Mini House #1. I'm glad I waited / procrastinated because the window in our new bedroom is wider. Procrastination paid off (well, this time!)

Here's what ya need:
Fabric -  1 to 2 yards. I used Premier Fabrics 
1x12 wood - Loews
L-brackets - Loews
Batting - Local shop but of course Michaels has it
Powershot Staple Gun & Staples - Best.investment.ever.
Dewalt Power Drill - Nick's personal fav!

Here is my fabric. You can buy it here.  

There are many of ways to build a pelmet box. My sister Allison recently made not one but TWO adorable pelmet boxes by following these instructions from the Little Green Notebook.

We took a slightly different approach. Still easy & inexpensive but instead of duct tape and foam board we used wood and power tools. 

Lowes employee cutting the 1x12 into three pieces

 
Iron your fabric folks! Wrinkles are totally tacky.

Roll out and cut your batting to match the wood

Place fabric, batting & board. Supervisor Dorsey Dog. 

With our fabric, we had to line up the pattern so it would repeat correctly which required us to adjust and re-align several times. If you are borderline crazy like us, it has to be perfect.  

Staple your heart out! 

My advice - there is no such thing as too many staples.  When I did the pair of chairs earlier this summer I learned the importance of ample staples and getting the fabric very taut.

We made ours with three pieces - so repeat the above steps for the sides after you finish the center piece. 

Use the L-brackets to attach the sides

BEFORE

AFTER

Now that it's up, I'm considering some type of trim. I picked up some options at Michaels yesterday. What do you think?

I plan to get Allison's "how-to" guide on making a pelmet box sans power tools (hint, hint Sissy)! Happy Thursday Y'all! 

Friday, July 30, 2010

DIY-Destination Sign

It was my intent to share my latest project last week but Dorsey Dog got sprayed by a skunk before we were about to depart for Nashville. Nightmare. I'll post about that Doggie Drama another day.

Moving on. Some of you have asked, "Where do you come up with this stuff?" I'm a copycat. I'll see something and with Nick's help figure out how to make it with a touch of my own flare. This project's inspiration was pulled from May's House Beautiful along with several variations popping up on Etsy.

You can buy this here & it has the option to make a custom one.

I like to think that you guys are checking my blog religiously so here's the moment you've all been waiting for - the BIG REVEAL!


Bam!

Our Version

Now for those who are interested on how to create your own, keep reading friends.

Head to Michaels and bring the list below to purchase the nuts and bolts:
24 x 48 inch primed canvas. $14.99 w/ coupon
2" inch stencils. $1.99 on Clearance
3" inch stencils. $0.99 on Clearance
4" inch stencils. $1.99 on Clearance
Jar of black acrylic paint.  $5.99 w/ coupon
Tube of acrylic paint (color: titan buff).  $8.99 w/ coupon
A spool of ribbon. $0.99
Grand Total:  $35.93  vs.  $295 price tag online
*Michaels always seems to have a 40% coupon on a full price item

Prep Work
Here we go!

It only took one coat 

Make a List, Check it Twice.
We created a list of every place Nick and I lived starting from birth until now. This is where you can get a little creative (i.e. instead of Cincinnati, we used the Queen City). This helps to switch it up. From there we taped together a paper "canvas" so we could see the spacing and make adjustments. This step is critical, I repeat critical.

We were working three different sizes of stencils so in some cases where we thought we'd use a 4" inch stencil, we had to swap for a 3" inch because there wasn't enough room. (As you can see with the Excelsior mishap below).

Dry Run

Paint & Patience.
Once you have your rough draft, it's time to paint. We created a system: I held the stencil, Nick would paint then we would wipe off the stencil and use the hair dryer to dry the letter. This is a one letter at a time project. 

The ribbon is used as a guide

Note: a sunny day, a big pitcher of lemonade, an iPod and a heap of patience are also necessities! Unfortunately, those you can't buy at Michaels at 40% off...  :) 

Slow and Steady

Note: As you work your way down you'll want to continue to re-measure to make sure the spacing is still accurate. The last thing you want to do is have your final city "smushed" at the bottom.

Hairdryer - hot for a few then switch to cool.

I'm not sure how many hours we spent on this project. It was a lot. We were able to complete half in one weekend and then moved our work station into our garage and finished the final cities over the course of a few evenings this week.

Final steps are finding the perfect spot for your new artwork, attaching brackets to the back and hanging. 

One more look.

Nick and I both agree that this is our favorite project that we've done. It is so personal and it looks awesome in person. 

If you want one of your own but don't want to put in the hours there are several spots online to get a custom one made. No I'm not starting this as my business so go here. 

HAVE A GREAT WEEKEND! Go out and make something folks! 


Wednesday, July 21, 2010

Elephant Envy.

Here is my tale of the one that got away. On Monday I was out thrift shopping and spotted an elephant in the room. Literally. A white ceramic elephant with gold accents.

I don't know about you but I have a few questions that I ask myself when considering a purchase - Do I need this? Where would I put / wear this item? And so on. While I was having this inner-monologue, I realized my hands were full and to me that is always a sign to check out and go home. However, on my way out I snapped a pic because I liked him and figured I would think about it and could come back for it.

Spotted: Mr. Elephant in Local Thrift Shop

Later in the afternoon I sent the image above to my sister Allison and her immediate response was "Buy now." I messaged her back that I already left the store, her response was "Pull the trigger, don't miss out." Just the validation I needed! 

To add to the elephant intrigue last night I kept seeing elephants on some of my favorite design blogs and in several lay-outs in LONNY. If you aren't familiar with LONNY it is "the"online decor mag!

From LONNY. Posted here.

 
Image from one of my fav blogs.

We all know what happens next but I'll still share. I went back to retrieve Mr. Elephant and of course he was gone.  I blame this next sequence of events on the over-consumption of coffee this morning: I proceeded to frantically search the store for Mr. Elephant and goes as far as locating the manager to inquire.

Our convo went like this, "I was in here yesterday and there was a white ceramic elephant" (picture me doing hand gestures on size and location of Mr. Elephant) and before I could go into more detail of my saga he cut me off without hesitation or empathetic tone to say, "Sold."

Now you may think this blog entry is totally ridiculous because it's about a ceramic elephant that can most likely be purchased at one's local Pier 1 store , but I feel like everyone has had this moment; a time when you missed out on a great find or just assumed it would be there when you went back for it.  Sometimes those "if it's meant to be" type moments are nice but that's only when it's still there!

If you've had a "the one that got away" moment, I'd love to hear about it!  Seriously friends, if no one responds I'll think the California sun is doing more than just making me tan but in fact damaging my brain.

Happy Hump Day!

Wednesday, July 14, 2010

Mini Gallery Wall

From the Pottery Barn catalog to design blogs, gallery walls are pretty much every where these days.

In my opinion what makes a good gallery wall display is when they are a blend of artwork and photography. A gallery wall is your chance to personalize; seize the opportunity and create your own!

This one is fun!

Nick and I had a gallery wall in our loft (our first place) in downtown Denver.  We had a long narrow wall and so we decided to take a stab at creating our very own.

Our Rookie Attempt

We talked about hanging it again in our office at Mini House but somehow in the 10 months that we lived there it was just one of those things that we never got around to.

On Saturday we discovered the box with most of the prints in our garage and thought heck, why not!
 This time we decided to lay-out our "design" 

Confession - last time we literally just had a stack of prints and nailed / hung our way down the wall.  I have read blogs about planning, measuring, taping and other strategic methods.  Me nor Nick has enough patience for all that jazz... 


Here's what we've got up there:

  • Pair of bird paintings that me & my BFF created. I blogged about it here
  • Hershey print  - birthday gift from me to Nick
  • Wedding picture collection 
  • Collage of album covers from Mason Jennings (Nick's favorite musician) 
  • Photography from my oh-so-talented friend, Becca.  Check our her photography site - here
  • Picture of me at age 3 that use to hang in my grandfather's office. 
  • A Colorado print that I got off Etsy 
  • A small framed print that my sister Amy picked up for me in Prague 
Our gallery wall isn't quite complete but it's one of those projects that we can add to and change out over  time.  

Do you have a gallery wall at your house?  If so I'd love to see it! 

Monday, July 5, 2010

A Love for Laundry.

When it comes to laundry and my life - it is one of those things that keeps getting better with time.

To give you a brief (unnecessary) historical timeline
2005 - 2008: Coin laundry in a very creepy basement
2008 - 2009: Miniature stacked unit in a closet at our loft
2009 - 2010: A big girl set from 1980-something in our Mini House basement

A little dated but oh so faithful 

So when we arrived in Mini House #2 and there was nothing but hook-ups it was absolutely necessary to purchase our very first set.  Decisions, decisions.

A clean slate.

After a few trips to Sears and some online research, we pulled the trigger on a pair of Samsung front loaders.  
They arrived on my Birthday!  
Now a Nautical Nook 
The bulletin board was a recent project - custom, quick & easy

Talk about an upgrade! New machines, no steep basement stairs or quarters required. I'm happy! 

It was fun to decorate this little space. Notice my recent coastal accessories / purchases that I told you about here.  The shelves, rug and laundry bin were purchased at IKEA - the mecca of affordable whatnots.  

I actually enjoy laundry and now even more in this bright, cheery laundry room.  

Thursday, July 1, 2010

Coastal Chic on the Cheap

When in Rome... or in my case when in California. I've gotten the itch to bring a little coastal flare into our new Mini Cottage.
Umm.. yes please. Courtesy of Coastal Living.

Now I don't want you to worry that I'm going to take this too far and turn our house into one of those over-themed rooms from Extreme Home Makeover. I promise to keep this under control.
Exhibit A. You Get My Point, Right?

As you may or may not know,  I am currently unemployed so when I'm not job hunting (aka mass distributing my resume) I use a portion of my "free time" checking out local thrift shops and decorating Mini House #2.  I love it because it gives me stuff to blog about AND it gets me out of the house.

This week I discovered that San Clemente has some great little treasure troves! SCORE. The Craigslist hasn't been very impressive to date so these will be my sources for all my little projects and decorating adventures.

Here's a round up of my Coastal goodies: 
Red Coral Lamp - $4.00!  Talk about Deal of the Day! 
*And yes it works. 
I might change the coral to white but the red is growing on me.

Ay ay captain - $5.00
Wait til you see where this guy lives - Coming Soon!

Needlepointed delight for $8.00

Gotta have a BIG starfish - $1.00
A touch of seagrass. Lamp shade - $1.00
Surprise Shell in a box of goodies from Sister.  FREE.

All these items are spread out throughout our house to avoid the beach overkill.  I'm putting the finishing touches on my laundry room and can't wait to share the final look.  It's pretty stinking cute. 

Happiest of Happy Fridays to Each.Of.You.